Zuchini Lasagna Rolls

Zucchinis are one of my most favorite vegetables. They are low carb, tasty and nutritious. I love adding them into my frittatas but one of my favorite zucchini dishes is lasagna roll ups!

This is a great recipe as it’s filling but not too heavy. It’s gluten free, keto friendly and a perfect healthy dish for the summer. You can also create a vegetarian recipe by omitting the meat and using the marinara sauce by itself.

Ingredients:

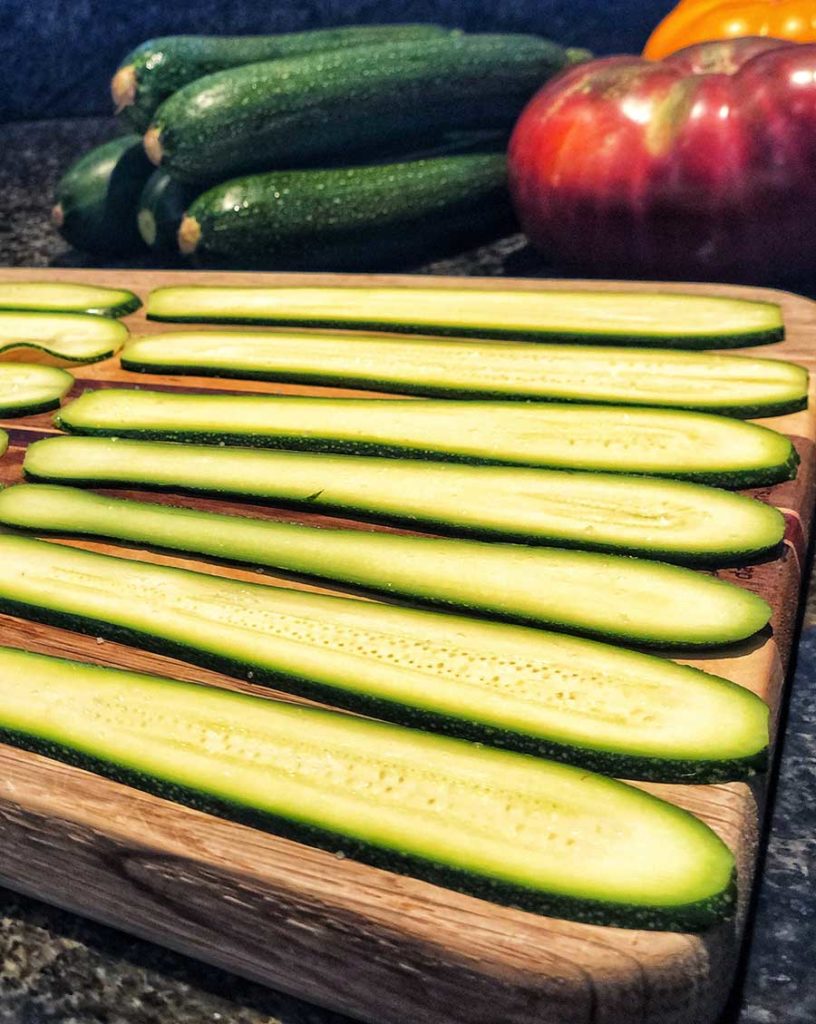
4-5 medium zucchini sliced lengthwise into 1/8 inch thick strips

1/2 lbs ground beef

1/2 medium sized onion (chopped)

2 cloves of garlic (minced)

1 1/2 cup marinara sauce, divided

1 cup shredded mozzarella

3/4 cup freshly grated parmesan

Directions:

Slice the zucchinis using a mandolin to 1/8 inch strips. (The thinner, the better they roll). Lay zucchini stripes flat and sprinkle each side with some salt. Rest for 15 minutes. Then pat dry with a paper towel. This will help getting the excess water from the zucchinis out so it doesn’t water down your dish later on.

Marinara sauce
Marinara sauce

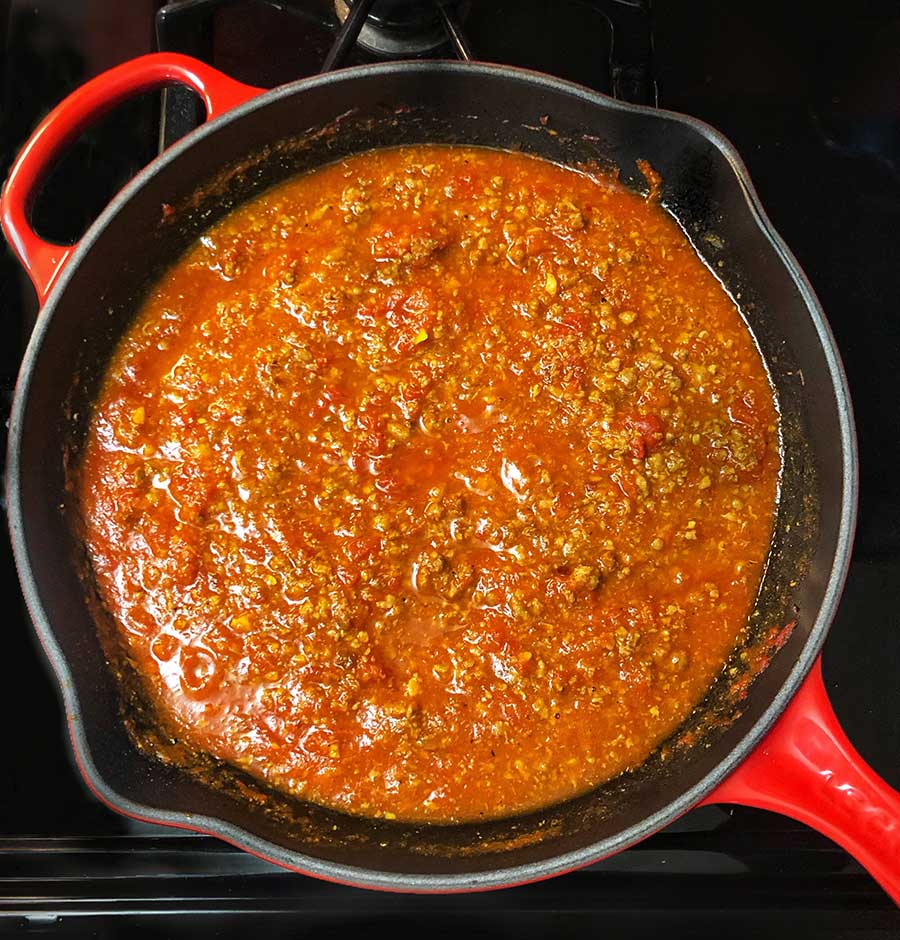
in a large skillet, heat some vegetable oil. Add the chopped onions to it and cook for 3-4 minutes. Lower the heat and add the garlics and continue stirring until you can smell the garlic aroma. Add the beef and cook for 10 minutes and until browned. Add 1 cup of marinara sauce to the pan, place the lid on and cook on medium heat until the sauce gets thicker. (You can adjust the sauce by adding 1-2 TBS of tomato paste and water to it) Season with salt and pepper.

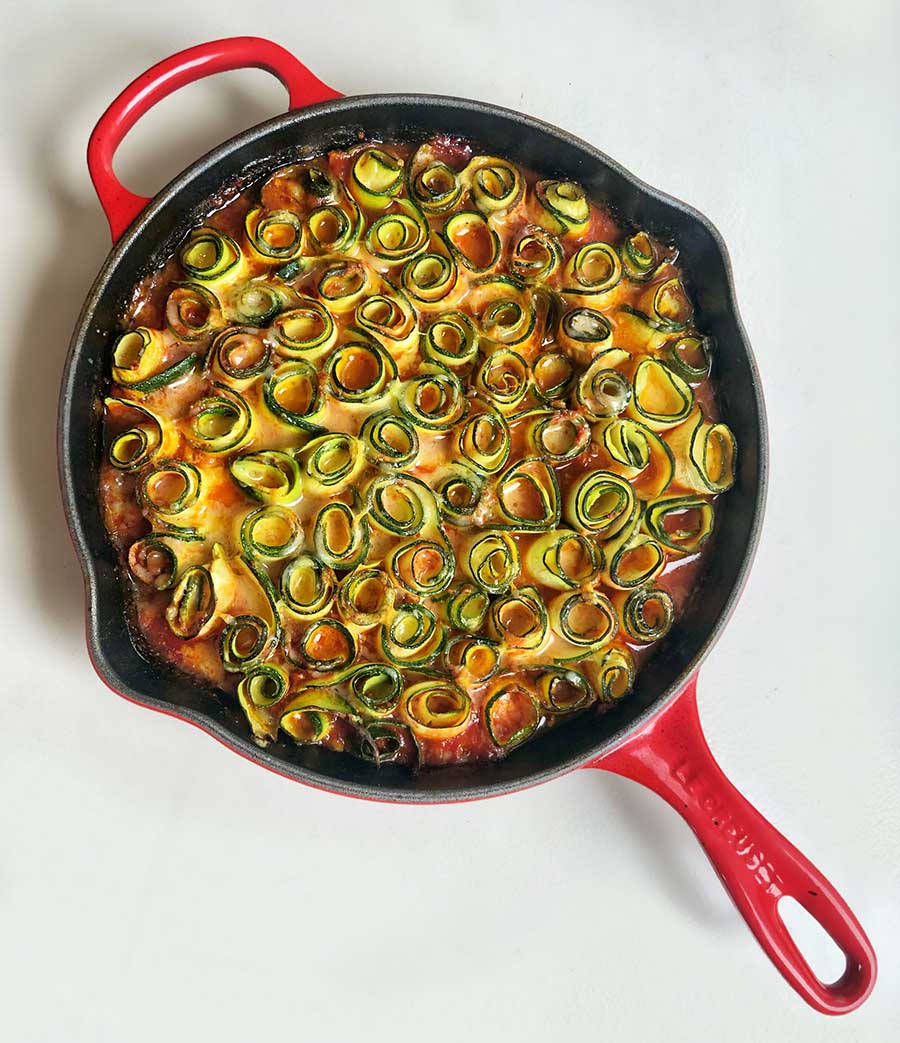
Preheat oven to 400°F (200 °C). Spread the marinara sauce onto the bottom of a 1 inch oven-proof dish or use the same skillet.

Rolled Zucchinis before they are placed int he oven

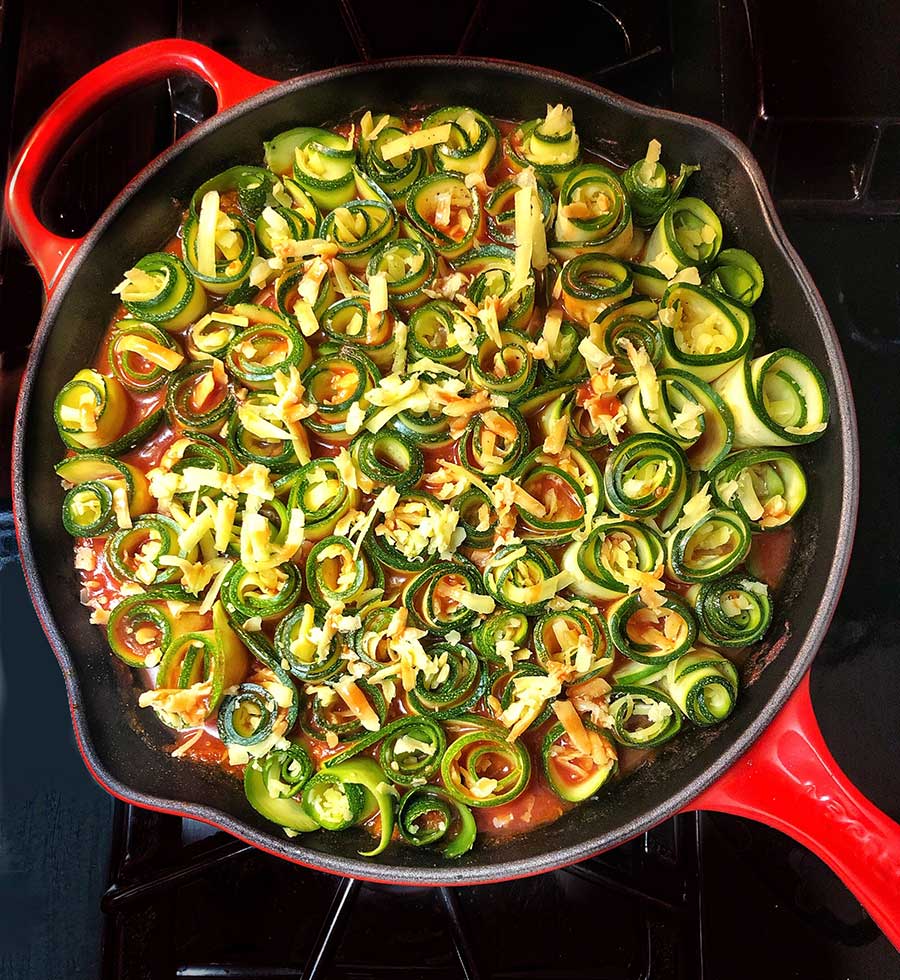
Sprinkle each slice of zucchini with some fresh mozzarella and parmesan. Roll up, then place in the prepared skillet; repeat with remaining zucchini slices. Top with remaining 1/2 cup marinara sauce and sprinkle with remaining mozzarella and parmesan.

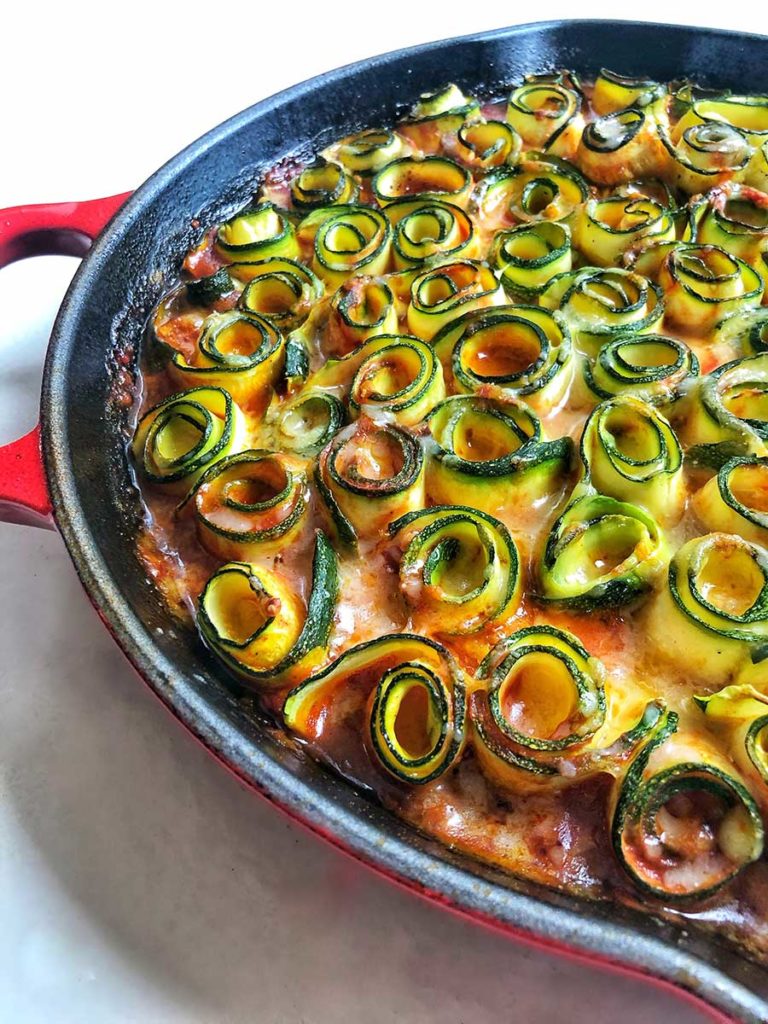
Place into oven and bake for 25-30 minutes, or until lasagna rolls are heated through and the cheese is beginning to brown.

Serve immediately!

Cheese and Mushrooms Crustless Quiche

I love savory breakfast dishes so I tend to make lots of Frittatas, Omelets and quiches! This cheese and mushroom quiche is one of my all times favorite. It’s so filling and there are so may variations you can introduce to the recipe and create your own!

THE DIFFERENCE BETWEEN QUICHE, FRITTATA AND OMELET:

In short, a frittata is like an unfolded omelet or a crustless quiche but there are still more differences. Frittatas and omelets are both made without any crust but what differentiates an omelet from a frittata is that an omelet is usually made to serve one, while frittata is made to serve one or many. In making frittatas, you mix the fillings along with the beaten eggs where in making an omelet, you will add the fillings over the eggs once the egg is about to set. You will then fold them in half.

In making frittatas adding milk or cream is crucial while omelets do not contain any milk. Quiches on the other hand are more dairy base. The crust can hold on to the dairy quite well and so the cream to egg ratio is about 2:1. Quiches are made entirely in the oven where omelets are made on the stove top and frittatas are made on the stove top but finished in the oven.

CREATIVE FRITTATA COMBINATIONS:

Spinach, artichoke and feta cheese

Zucchini, squash, dill and cheddar

Asparagus, shallots, chives, ricotta and swiss cheese

Mushrooms, arugula and goat cheese

Broccoli, cheddar and chives

Cherry tomatoes, mozzarella and basil

CAN YOU REHEAT THIS CRUSTLESS QUICHE?

Yes, you can! While you can absolutely enjoy this dish when it’s at room temperature, you can also heat it up in the toaster oven, pan (low heat) or even microwave. I am personally not a huge fan of microwaving food so I prefer the first two options. (Tip: Make sure to not overheat the dish as the eggs can lose their water content and become rubbery)

INGREDIENTS:

4 large eggs

1 small onion (diced)

2 cloves of garlic (minced)

8 oz. sliced mushrooms

1/2 lbs bunch of fresh spinach

1 cup of milk

1/4 mozzarella (grated)

1/4 cup Feta cheese

1/4 cup parmigiano reggiano (grated)

5-6 halved sun dried tomatoes

Salt and pepper to taste

Chopped walnuts (optional)

DIRECTIONS:

In a large pan, sauté the onions for about 5 minutes until they are translucent. Add the garlic and sauté for an additional 2 minutes or until you can smell the aroma of garlic. Add in the sliced mushrooms and the spinach.Cook until they become soft and the moisture is evaporated entirely. ( This is quite important as excess water can soggy up your dish)

Preheat the oven to 350 F. In a medium sized bowl, whisk the eggs, milk, feta and half of the parmigiano-reggiano (you can add the walnuts in this step for more texture).

Coat a 9-inch pie dish with some olive oil. Gently, add the sautéed onion, garlic, mushrooms and spinach to the egg batter. Season with Salt and pepper.

Top with Shredded Mozzarella, the reminder of the parmiginao and halved sun-dried tomatoes.

place the dish into the oven and bake for 45-55 minute or until the top is golden brown. Enjoy!

Healthy Delicious Banana Bread

Craving for something sweet? This gluten free banana bread recipe is all that you need . It has all the simple ingredients that your body loves and it’s easy to make.

Sugar Free, Gluten Free Banana Bread


Ingredients:

1/2 cup Oat Flour

1/2 cup Quinoa Flour

1/2 cup Almond Flour

1/2 Tsp Baking Soda

1 TSP Baking Powder

1/2 TSP Salt

4 TBSP Honey

8 TBSP coconut oil

3 Eggs

4 TBSP Almond Milk

3 Ripe Bananas ( 2 mashed and one diced)

1 TSP Ground Cinnamon and Nutmeg

Walnuts Chopped and as much as you like!

Recipe:

Preheat the oven to 350°F. Grease and line a 9X5 loaf pan with parchment paper and set aside. In a blender or food processor, mix the coconut oil, 2 of the mashed bananas, honey, eggs, almond flour, quinoa flour, oat flour, baking soda, baking powder, salt, cinnamon and nutmeg and almond milk until smooth. Add the diced banana and chopped walnuts into the batter and gently mix them in.

Pour the batter into the prepared loaf pan. Smack down the pan a few times on to the counter to break up the air bubbles.

Place in the center of the oven and bake for 35-45 minutes or until the loaf is golden brown and the top is firm to touch. Remove from the oven and allow it to cool in the pan for about 10 minutes. Once it cooled off completely, you can slice it and enjoy it!

( I have used a larger pan for this recipe which resulted in a thinner banana bread, also, i’ve used the slivered almonds at the bottom of the pan for a better texture and look)

Bacon and Potato Roses

Love Bacon?

Love Potatoes?

How about a fun delicious recipe for bacon and potatoes that not only turn heads but it’s easy to make!

Ingredients: ( for 6 roses)

6 small potatoes

6 strips of bacon

Black pepper to taste

Fresh Thyme ( optional)

( You would need one small potato and one strip of a bacon per flower, however, if you want to make bigger flowers, use a larger potato and two strips of bacon overlapping vertically)

Instructions:

Preheat the oven to 400˚F (200˚C). Using a mandolin, thinly slice your potatoes and set aside. You can, of course, use a knife but a mandolin is much easier and you’ll get a much more consistent cut. Place one strip of a bacon on a flat surface and line the bacon with the sliced potatoes. Make sure each potato is overlapping.

Starting at one end, gently roll up the bacon and potatoes to form a rose. Place the potato flower in a cup cake mold and repeat the steps for the remainder of the potatoes and bacon strips. Bake for 20 minutes then remove from the oven. Cover the dish with foil and place back into the oven for an additional 30 minutes.

Bacon & Potato roses, sautéed vegetables, Spring Salad

Sprinkle with some fresh thyme and serve it with the egg of your choice. I love to serve it with fresh sautéed vegetables on the side! Enjoy!

Fun Easy Summer Desserts

Celebrating Independence Day may not be the same for many of us but that doesn’t mean that it shouldn’t be fun and delicious. Thus, I would like to share a few ideas on some festive desserts to prep for the 4th of July!

Assortment of cupcakes ( Blueberries, Cherry, Raspberry, Chocolate Hazelnut, Banana and Pecan)

One of my favorite desserts for warm summer days are Popsicles! I have fond memories of enjoying some freshly frozen delights after a day under the blistering sun. The preparation is simple; take fresh juice or smoothies and freeze them! No need for added sugar, coloring or any other additives!

Fresh fruit popsicles and berries

Now that I’m all grown up, I thought I’d try one of my favorite desserts with an adult twist – wine! And it’s oh so delicious. Here are a few suggestions to keep in mind if you’d like to prep your own variation.

Since there is a wide variation of wine characteristics, I’d recommend utilizing a crisp and dry white wine as a base. Wines such as Sauvignon Blanc or Pinot Grigios pair wonderfully with berries and other summer fruits. Same with many Rosé and sparkling wines! Further, I’d recommend blending the fruit instead of buying juice so you get the texture and aroma without it being overly sweet. I’d suggest berries like strawberry, raspberry, blueberry or a combination therein or other types of stone fruits like peaches or plums.

Popsicle in Sparkling wine ( Raspberry, Peach and Strawberry )

You can also vary your approach. For instance, you can make the regular fruit popsicle (fruit only) and dip it into a glass of wine or you can actually make Winesicles – a combination of wine and fruit. Here’s an example of a Winesicle:

Strawberry popsicle
Strawberry popsicle

Grab your favorite bottle of sparkling wine, white or Rosé. Then for every cup of wine, mix in a cup of fresh juice, add some berries or other stones fruits and then freeze over night!

Cherry and Peach Panna Cotta (front), Raspberry and Strawberry Panna Cotta (back)

Another delightful dessert to make is panna cotta. They are so easy to make and are perfect for the summer. What makes them so great is that they are perfect base to add many different combinations of flavors. Fruit, chocolate or matcha to name a few. Here’s how to make it:

2 cups heavy whipping cream

1 cup whole milk

2 1/2 tsp unflavored gelatin

1/2 cup sugar

1 1/2 tsp vanilla extract or one whole vanilla bean

1 cup sour cream

Fresh fruit to garnish (optional)

Chocolate Panna Cotta

Add 2 cups heavy whipping cream, 1/2 cup of sugar, 1 1/2 tsp vanilla OR the seeds and the pod of one Vanilla bean in the saucepan. (To use the whole bean, simply halve the Vanilla bean lengthwise and scrape off the seeds using a knife). Bring to simmer over medium- low heat, stirring occasionally. After about 5 minutes and once the mixture is steaming, remove from heat and allow it to cool for 5 minutes. Make sure you don’t boil the cream. (Discard the Vanilla bean pod if you used a whole bean)

Place 1 cup of milk in bowl and sprinkle the gelatin over it. Let stand for 5 minutes or until gelatin is softened. Add the gelatin mixture to the hot cream and mix well.

Place the sour cream in a bowl and while whisking constantly, gradually add it to the cream. Once the mixture is smooth, divide it into 6 wine glasses or any dish that you like. Refrigerate around 6 hours or overnight. Top with fresh berries!

Gluten free, dairy free cupcake with cherry

Finally, A simple gluten free, dairy free cupcake doesn’t hurt anyone! speciously when it’s so delicious! While I’m working to create my own recipe, here’s a brand that I trust and use mostly. Follow the instructions on the box, add fresh berries or nuts of your choice into the batter and make different varieties of cakes or cupcakes each time.

Gluten free chocolate cake with Raspberry and cream filling.

For the photo above, I added fresh raspberries and cocoa nibs into the mix. To make the filling, I simply whipped some heavy cream with 1 Tsp of honey along with crushed raspberries. Let me know what are some the combinations you’ve tried?


Introduction

While my initial intention for the blog was to focus on travel, I decided to introduce a new segment in light of current circumstances.

Living in San Francisco under quarantine has been certainly challenging for us. We miss our regular hangouts with friends, casual morning walks or dinners out during the weekends. But as human beings, we learn to adapt, to accept the challenges and prepare for what lies ahead.

While the first few weeks of sheltering-in-place was strange and uncomfortable, the following weeks introduced a whole new perspective on life and lifestyle. For me, I tried to focus more on my day-to-day activities; whether it be calling an old friend, exercising at home or spending more time in the kitchen. Sure enough, one thing that has kept me occupied the most has been cooking. I’ve appreciated trying new or creating my own recipes and sharing them with friends. It has been one delicious way to manage the time since travels have been put on hold indefinitely, at least for us.

Here, I will write about my lifestyle and the things that will hopefully get you inspired!